Sunday, September 29, 2013
Kansas City Star Block of the Month #1 - Jacobs Ladder
Hey there! Happy Sunday! On Tuesday we had the first meeting of the Ft Leavenworth Quilt Club. We discussed doing a quilt for auction, or opportunity quilt or even making a charity quilt. Like many committees we came to no conclusion and decided to put the decision off until another time. Lets just quilt! So our first block is Jacobs ladder. It is crazy easy and ultra traditional. Jacobs ladder is know by many many names (Stepping stones, Trail of the Covered Wagon, Wagon Tracks, Underground Railroad, Double Hour Glass, The Railroad, Golden Star and Pacific Railroad just to name a few) and dates back to before the revolutionary war. Now that is an old block.
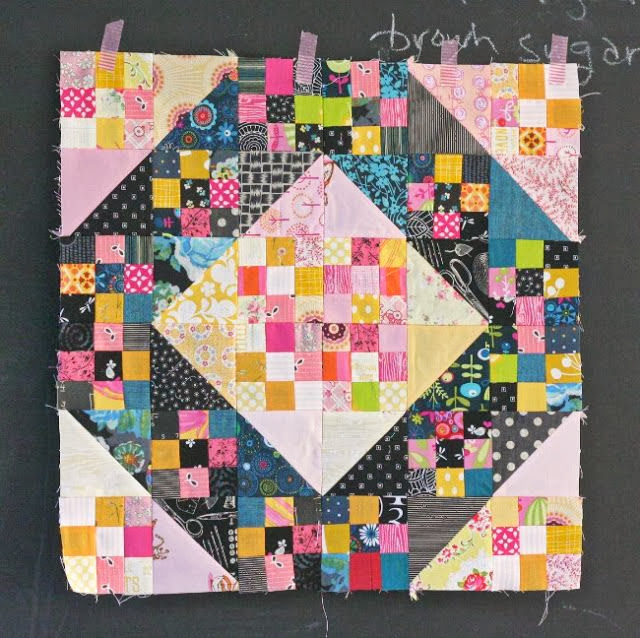
Here it is in our quilt. Just hanging out near the center. It looks a bit different set on point.
The next several images I found on Pinterest (the best website ever- I will also be making monkey bread later...too many delicious images) in no way am I claiming that these are my quilts or my pictures. I just wanted to show you different quilts made with a Jacobs Ladder quilt block.
The one above is great because instead of using 4 patches and half square triangles the quilt maker used 4 patches and star points. She also created a curved illusion by making the white squares into snowballs. I love this and I may try something similar in a quilt for myself.
This one is full of scrappy goodness! Instead of a 4 patch the quilter used a scrappy 9 patch. I think that is just wonderful!
Here is a Jacobs ladder with sashing between the blocks. Neat effect right?
And here is a very simple one.
This is more of the scrappy 9 patch one by Blue Elephant stitches.
This is a nice modern one by Rita of Red Pepper Quilts. It is a more simple version of the block but it sure works well doesn't it?
And Finally check out the way this quilt maker used a simple Jacob ladder block to create a powerful final border to this taupe quilt. I love it!
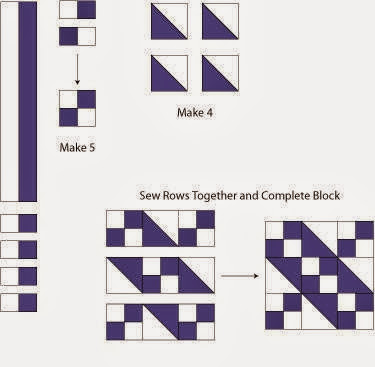
So here is a basic graphic of how to construct the block if you like nice graphics.
Cutting instruction for a 12 inch block
cut 4 - 5inch squares (2 dark & 2 from the background)
cut 2- 28 x 2.5 inch strips (one from the medium one from the background)
Place the 5 inch squares together face to face, draw a line diagonally down the center of the square and stitch a quarter inch on each side of the line.
Cut the block in half right along the line and press the seams open.
Sew the 2 strips together with a quarter inch seam, press the seam to the darker half and sub cut the 28 inch piece into 10 2.5 inch pieces.
Butt the seams together and sew them also together with a quarter inch seam.
I learned this nifty little trick with the center of the 4 patch from Tanya. Cool huh? You gently tug the center of the seam and finger press and viola! This flat magic happens. It took me a while to get it.
Now sew your pieces together.
Only 4 of us were able to meet on Tuesday. I am positive it is mostly my fault because I was unable to decipher the majority of the email addresses on the sign up sheet. Please join us next time! Send me an email and I will be able to add it to the roster. My computer will be able to read it better than me. Turns out I am a bit of an idiot when it comes to interpreting handwriting.
tiacurtisquilts@gmail.com
And we are on Facebook! You can follow there too.
Next month we will be doing 2 blocks. The Cross and Crown and Maple leaves. They are very similar and will be easy to work at the same time.
Cheers!
Tia
Subscribe to:
Post Comments (Atom)


No comments:
Post a Comment
Thanks for commenting! I read each one. I will either respond via email or here in the comments. xo - Tia