Long Arm Quilting

Monday, April 2, 2012

A strip Quilt Tutorial

 Hey there! How about a happy Monday morning tutorial? If you are anything like me I bet you would love to have a quilt all finished by the end of the week. You may have some jelly rolls laying around the house and have no clue what to do with them, right? Well, this is a really simple and terribly fast quilt.

I found a tutorial on youtube somewhere, but I can't find it again.

 You will need a Jelly roll and the same amount of solid fabric cut into 2.5 inch strips. I used a jelly roll of hand dyes and it was smaller than your typical jelly roll, therefore my quilt is a bit smaller than the other one I made with a Moda Jelly Roll.

Sew your strip together like this.

solid-jelly roll-solid

and

jelly roll-solid-jelly roll

You need the same amount of each pairing - so divvy your fabric up in little stacks that look nice together.

 After your strips of 3 are sew together you will need to sew them into strips of 6. So once again divvy them up into sets. You will sew down both sides of the set to make a tube. I know it sounds wrong, but trust me.

 see, I am sewing  down one side....
 and now I am sewing down the other. Make sure your quarter inch seam is nice and straight.

 OK, so here is the step it gets a bit tricky. The is the most important step so cut carefully. You are going to slice right angle triangles out of the "tube". If you have one of these biggish square rulers use it for this step. You will cut these triangles out of both sides of the "tube". See, that is why you put seams on both side of the tube. You will have an Ahh haa moment when you cut your first and second block.

Go ahead and do that for each tube strip. It goes fast when you get the hang of it. Don't worry.

 You can stand back and admire your little stack of stripey blocks. My what pretty diagonals you have?

 there are several ways to make the blocks come together. Above is squares and below is hourglasses. I did not bother to try to match up the prints, too much work and I think scrappy is easier.


 Trim all your blocks to the same size. Very important that they are all the same size.

 Now, try out some layouts.

 squares

 hourglasses


sew your blocks together.
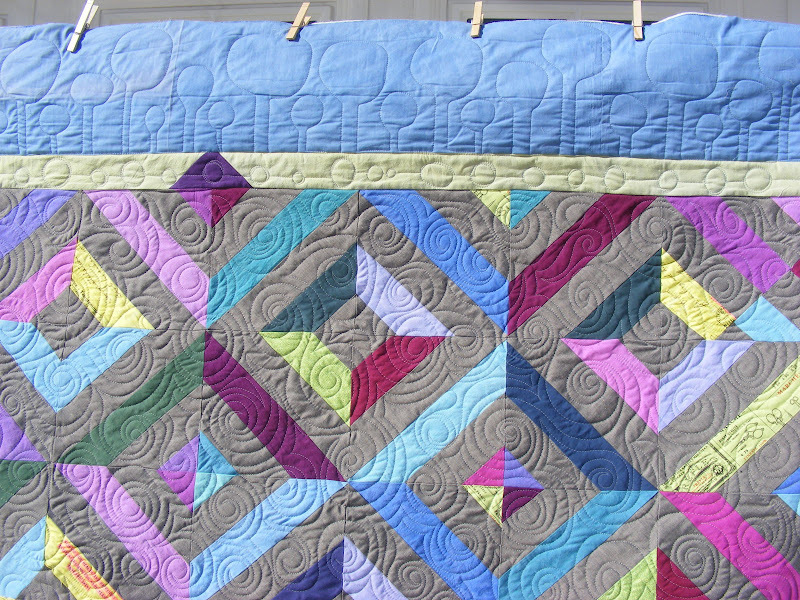
 I had a couple odd pieces left over, right? So I decided to a fancy narrow boarder. You know how you make the seams to make binding? Well, you can to something similar to make random triangles in your narrow boarder.

 See? it is like making a really WIDE flying goose.....or a small goose in a wide sky.

 Viola! Make the triangles random in the binding and they drive yourself nuts trying to match up the triangles with the triangles on the sides of your quilt top. I finally was able to manage it and it was totally by accident. See the picture at the top, since I did not catch the phenomenon in the shot below.

I also added another more wide boarder to the outside of the quilt to make it big enough to make it worthwhile. Too small quilts are annoying.

OK, let me know if you have any questions. I know this was a pretty slap shot tutorial, but maybe the pictures explain my technique better than my words.

Have a great day!
Tia

Thursday, March 29, 2012

something old

 Hey there! How are you doing? I hope you are good. Here is something you may or may not know about me. I love old quit tops and blocks. I love looking at how they were constructed I love looking at their fabric variety I love thinking about what was going on in the quilters life and wondering why she was not able to finish her project. I also really love to complete the quilts. Lately my hunting has gotten a bit out of control and I am going to need to figure out just exactly what I am going to actually do with all these old quilts. Besides use them....My house is full to bursting with quilts that I have made. But maybe a home can't have too many quilts, right?

 So, let's take a peek at this one. It arrived today from Ebay. $20 including shipping. Not a bad top. It is quite old, but what really excited me about this one is the way the quilter constructed the blocks. This would have been a really quick and easy quilt to piece today. Heck I think I could go into my sewing room and whip this top up in about 4 hours with strip piecing and rotary cutting. I think she found the most difficult way possible to to this pattern.

 Look at that! It is all inset seams. Amazing, isn't it? This lady did not do things the easy way did she?

 I also love how over here on the side she used a totally different color red. It is not faded...just a different shade all together. It makes me think of all these questions that I would love to ask her.

 I bought these blocks from Etsy. Aren't they pretty? These are really old and smell a bit like something used them as a latrine at some point in history. Some blocks are ok, others aren't. But for $12 I really wanted them. I think they would make a really pretty piece of art if they were just mounted in a 2 sided glass frame, don't you? Maybe in my forever home I will do that.


 Isn't this a fun block?

I know I have enough fabric of my own to sew with for the rest of my life, but there is always room in my studio for other quilter's orphans. I have a quilt orphanage! There is always room for inspiration and space to learn something from the fingers that took the time to stitch out these blocks.

Sunday, March 25, 2012

book reviews

 Hey there! How are you doing this weekend? My weekend has been wonderful. The weather was absolutely perfect. It is like the summer switch just got flipped to the ON spot. The kids have been outside all day long. While they have been playing, I have been reading through both of these books. I have read the Welsh quilting book before and I love everything about it, but the Denyse Schmidt book is brand new for me. What makes a quilt book really good for you? There was a time when I would buy almost any book I could find that was related to quilting or "Modern" quilting. But lately it seems like everyone and her sister has a quilt book out. Obviously with that many books saturating the market there are some that are bound to be much better than the others, right? Well, the  Denyse Schmidt book is absolutely fantastic and everything that you would expect from her. I love it that the quilts in her book are not ones that we will wiz through and forget about after we have bound them and tossed them to our children. Each quilt in her book is one that we can learn a new technique from.

OK, we KNEW her book would be awesome. What I want to chat about today is a book you may not know anything at all about. I had to hunt like a tundra fox to find a copy, but I did and I am as pleased as punch with my book. (I will tell you where to find the book at the end of the post).

Let's talk about Welsh Quilting Pattern and Design Handbook. Over the past year or so I have become a bit obsessed with Welsh quilting. So much so that I am teaching some classes at our local quilt shop about the unique quilting techniques the Welsh used on their quilts. Marjorie Horton did not write a fancy book, and it is published as simply as it is possible to publish a book, but the knowledge and information between the covers is deep and brilliant. Marjorie truly knows what she is writing about. 

 She begins with some simple outlines and fills them in with wonderful motifs. Simple repeats and arcs look complicated.


 I love her corner arcs. But they do not need to be confined to the corners of quilts. This same design can be anywhere in the quilt.

 She goes over marking the quilt and how to quilt with minimal marking. I have used this same technique with wonderful success with my small domestic sewing machine. I can't wait to take the skills that I learned on my little Berina to my big Long arm.

So, if you want a REALLY good quilting book (NOT a quilt making book, a QUILTING book) please write Jen Jones in Wales and order this handbook. You have to actually write her an email and she will write you back and you will work the deal that way. The book is not on Amazon, but it is worth every penny I sent her.

Thursday, March 22, 2012

Strip quilt is quilted

 Here is my strip quilt all quilted and lovely. This may be my new favorite quilt. I love all the hand dyes and the greens are some that I have kept hidden away in my stash and I finally decided to use them. They look even better in a quilt than they did all folded up on the shelf.

 So, for this quilt I really wanted to just do an all over quilt design. I knew I wanted to do the Echo Swirl that I am loving right now, but then I saw those 2 boarders...and I just couldn't do an all over design. The boarders needed to be quilted differently. I did not want to invest another week of my life quilting this quilt because I have many many other things to do besides submitting to the luxury of quilting for myself.

 The boarders were new to me. Sharon has used both of these designs in her quilts and I decided to take them to my long arm and see how they went. I think I could have made them more detailed, but the simplicity is quite appealing to me. I think the swirls and circles go well with the straight lines and angles of this strip quilt.

 I have a tutorial worked up for this quilt if anyone would like to see it, I can put it up easy enough.

 This is the back of the quilt. I used my favorite 200 thread count muslin. I think it will wash really well

My Swoon Quilt is Quilted

 I finished the quilting for this quilt yesterday. For some reason it seemed to take ages to quilt. It is large, but I have quilted larger much faster. I had many many thread breaks with it, but I think it was because my points were not super flat. I will keep that in mind for next time. But I don't think there will be a next time for me and making a Swoon quilt. I just really don't like to follow patterns.

 I am quite please with how the quilting turned out. I love the echoing swirl I used for the background and I could hardly wait to quilt another quilt with the same design. In fact, I only waited until I could load up my next quilt!


 This is the back, but not the best picture. I may put up another shot after I bind it.

I already have one side of the binding in place. My Bernina 820 is home again. Wish us luck.

Sunday, March 18, 2012

A quilt for Wool -n-cotton

 Hey there! How are you doing? I hope you are all good and enjoying fine spring weather. I just finished this quilt and thought I would pop it up on the blog. It is for my Local Quilt Shop (Wool-n-cotton). I will be teaching several classes there over the next couple months, so they wanted some samples of my long arm quilts. The classes I will be teaching are machine quilting on your domestic machine since that is where my roots are planted.

Denyse gave this vivid top to me and said to do whatever I wanted. I decided to make it kinda like a quilting sampler. The simple block pattern really made for a great stage for some modern quilting.


Needless to say I had an absolute blast quilting this top. I used my quilters dream cotton batting and silver So Fine thread